Showing posts with label Birthday card. Show all posts

Saturday, June 9, 2012

Old, New Borrowed and Cool Birthday Card

Lately I feel like a scrapbooker who makes card. Next to December, when I made 80 Christmas cards, May and June is the biggest card-making season for me. Between birthdays, anniversaries, confirmations and graduations, I am in a card-making frenzy! Today, I have a card that fits Kelly Goree's Old, New, Borrowed and Cool challenge. This card uses an old Hero Arts butterfly stamp (one of the first I bought and still a favorite) a new background stamp, a borrowed design from a sketch I found on the Hero Arts blog, and some very cool bling. Here it is:
I started with a standard sized card base and four of my favorite patterns from the 6x6 pad of Basic Grey's Out of Print. I created the background pattern on the striated pink paper using a Hero Arts background stamp, VersaMark ink, white embossing powder and my heat tool. I adhered this piece and a coordinating pattern to the front of my card. Next, I stamped the banner and cut it out. I masked half of the sentiment so that I would have a clean spot to place my butterfly. I stamped the butterfly, cut it out and filled in all of the openings on the wings with Diamond Stickles. After adding the butterfly with foam adhesive, I felt the card needed a little something extra so I added some rhinestones to the banner and rounded the corners. Here's a closer look:
Supplies:
Cardstock (Not shown): Papertrey Ink (Stamper's Select White);
Patterned Paper: Basic Grey (Out of Print);
Stamps: Hero Arts (Flower Dot Pattern; Calico Borders);
Ink: Memento (Tuxedo Black); Versamark;
Misc: Zing embossing powder (white); Diamond Stickles; Recollections rhinestones; EK Success Corner Rounder.

Friday, September 23, 2011

CR84FN Challenge & A Winner

Hellooooo! Is anybody here? That's probably what you have been wondering. It has been a whirlwind this past month. Since I wrote my last blog post, I have experienced an earthquake (a rarity in New York); prepared for Hurricane Irene; spent hours on the phone (mostly on hold!) rearranging our travel plans because of said hurricane; went on a wonderful 7-day cruise to the Western Caribbean; had said cruise turn into a 9-day cruise because of Tropical Storm Lee; and missed the first day of school because 7-day cruise was now a 9-day cruise. You get the point. It seems like we jumped off the high board into the deep end of the pool this September. There was no time to gradually get back into the swing of things so blogging has taken a back seat. It's taken a month, though, but I think I can come up for air! So finally, I have a project to share.

Today's card uses the colors from the CR84FN38 challenge.


Here's my card:

My sister is a francophile and her home pays homage to her love of all things French. There are Eiffel Towers everywhere. (She even has a purse shaped like an Eiffel Tower!) She loves Paris as much as I love scrapbooking and if I tell her that I am going to Paris this weekend, she knows that I am scrapping! On a recent visit to her home, Melissa and my niece, Sarah, went from room to room and counted more than 75. It was their own version of Where's Waldo! So, you can understand why I hoard any papers or embellishments that picture the Eiffel Tower to use on her birthday card each year. The paper on this card was from Echo Park's 2010 Be Mine collection. (Yes, I've been saving the paper for that long!)

To create the card, I cut a piece of Papertrey Ink Smokey Shadow cardstock to a standard size. I cut the white cardstock 1/2-inch smaller on each side so that the finished card would have a 1/4-inch border. Next, I cut a piece of patterned paper 1/4-inch smaller and stamped a background image on it. For the focal point, I matted the journaling card onto a piece of Smokey Shadow cardstock. I used Distress Stickles to add some bling to the Eiffel Tower as well as the ornate trim along the top of the card. Finally, I stamped the "Happy Birthday" sentiment, added a row of pearls to the top of the mat, adhered it to the card using foam dimensional adhesive and added a ribbon from my stash. Here's a closer look:

Now for some unfinished business.... Last month, I participated in the August Sketch Blog Hop and I offered a little blog candy for those who left a comment and became followers. At last, I have a winner. Drum roll please! The winner is:
True Random Number
Generator
Result:
12Powered by RANDOM.ORG\

That means the winner is photochic!
photochic said...

I LOVE the paper! So cute! Great layout.


Please e-mail me with your name and address so that I can get your prize to you. I will be putting in an extra goodie or two to thank you for your patience!

Supplies
Cardstock: Papertrey Ink (Stamper's Select White; Smokey Shadow);
Patterned Paper: Making Memories (Sabrina); Echo Park (Be Mine);
Stamps: Hero Arts (Classic Fabric Design); Papertrey Ink (Birthday Basics);
Ink: Stampin' UP! (Basic Grey); Ranger (Black);
Embelishments: Pearl Stickers (Recollection) Stickles (Diamond); Ribbon from stash.


Wednesday, August 3, 2011

On the Road Again!

I just got back from the Creating Keepsakes Convention in Valley Forge where I had a great time scrapping and shopping. Tomorrow, I am headed back to Pennsylvania with Melissa to visit my sister. Since I have been spending so much time in the car lately, it seems fitting to share the card I made for my brother-in-law's birthday last month. Here it is:
I was inspired to create this card after a recent family gathering where we were all talking about our talents. Sal gardens. Mark runs. Melissa dances. My sister, Diane, speaks French and Spanish fluently. My niece, Lisa, sings. And Frankie drives. Frankie is the type of guy who would drive 200 miles for an afternoon visit. He has logged hundreds of thousands of miles behind the wheel of the car so we tease him that driving is his talent!

Here's the inside of the card. I thought the sentiment was appropriate!

Supplies:
Cardstock: Papertrey Ink;
Patterned Paper: Basic Grey (Wander);
Stamps: Hero Arts (Happiness Messages; Travel Journal);
Ink: Ranger (Black);
Tools: Cricut by Provo Craft (Graphically Speaking)
Pen: Uni-ball Signo Broad (White)

Sunday, March 27, 2011

Delightful Dahlia

Just a quick post tonight to share a birthday card I made for my best stamping friend. I've had the idea for this card in my head ever since she gave me this stamp set for my birthday. Here's the card:
To create it, I cut a standard size card and, using my Martha Stewart Scoring Board, created a frame for my mat and stamped image. Before I began stamping, I used scrap paper to create a mask for the large flower and leaf, plus two masks for the smaller flowers. For the stamped image, I started stamping in the lower left-hand corner. After stamping the first large flower, I covered it with the mask and stamped the other large flower above it. Keeping the first mask in place, I added the small flower and then covered it with a mask before stamping the leaves. Finally, I masked the leaf and stamped the remaining flower. I stamped the sentiment and used a Spellbinders Nestabilities to cut it out. I adhered the stamped image to the mat, tied a ribbon and adhered it to the card front. Finally, I added some bling and the butterfly pin.

Because creating masks can be time consuming, I plan to keep these masks with the stamp set for future use!!

Supplies:
Cardstock: Papertrey Ink (White); Stampin' UP!
Stamps: Papertrey Ink (Delightful Dahlia; Vintage Labels);
Ink: Stampin' Up (Rich Razzleberry; Wild Wasabi); Ranger (Jet Black);
Tools: Martha Stewart Scoring Board; Spellbinders Nestabilities (Labes One);
Misc.: Recollections Rhinestone Stickers; Webster's Pages Butterfly Push Pins; Ribbon from my stash.

Thursday, March 24, 2011

Labor of Love

That's what this card was. Melissa's 13th birthday was on Monday and since she is my biggest fan, I knew I had to make her an extra special card. Besides that, she kept asking for a really special card. The pressure was on! I knew I wanted to ink up a new stamp for maximum impact on the birthday girl, so I chose the Hero Arts Circle Design stamp. I kept playing with different designs and different colors and finally after close to 3 hours (which is about half of the time I was in labor with Melissa!) I came up with this:
To create this card, I cut the circle base and patterned paper mat with my Cricut. I made the lacy die cut with my Cuttlebug and the Spellbinders Lotus Pendants Nestabilities. Next, I stamped the Hero Arts Circle Design three times -- once on the kraft and two times on the patterned paper. After fussy cutting the leaves of one of the patterned paper images and adhering them to the kraft layer, I centered the medallion from the Nestabilities to the other image and ran it through my Cuttlebug. I adhered the top two layers with foam dimensional adhesive and finished off the card with some bling, faux stitching and a ribbon. Here's a closer look:
I am back to doing a Layout A Day (LOAD) and will start posting my layouts again next week.

Supplies:
Cardstock: Papertrey Ink (Dark Chocolate); Stampin' Up! (Kraft);
Patterned Paper: Basic Grey (Perhaps);
Stamp: Hero Arts (Circle Design);
Ink: Ranger (Coffee); Signo Gel Pen (White)
Tools: Spellbinders Nestabilities (Lotus Pendants); Cricut (Wild Card cartridge);
Misc.: Recollections rhinestones; ribbon from my stash

Saturday, January 15, 2011

Nifty at 50!

I have no recollection of my parents turning 50. No recollection at all! In fact, the first person I can remember turning 50 was a woman, Elaine, who sat at the next desk over at my first real job nearly 25 years ago. And, although 50 seemed "old" to me then, Elaine was in no way "old." What I do remember most vividly about Elaine turning 50 was that she purposefully stuttered every time she said ffffff-fifty. It became quite a joke around the office. Fast forward 24 years (and I do mean fast forward) and now I have a husband who is fffffffff-fifty! Yes, Sal celebrated his 50th birthday earlier this week and here's the card I made for him:
To make this card, I covered a standard size base with pattern paper. I cut the blue paper 1/4 inch smaller and stamped it with the new Hero Arts Happy Definition cling stamp. Next I inked up the Technique Tuesday tile and stamped that with the wood grain pattern. I distressed all of the edges in keeping with the 50 theme. LOL! I stamped a sentiment from a travel set on the red strip and finished off the edges with a postage stamp punch.

For the inside of the card, I cut a square mask. After inking the center of the square with blue, I stamped lightly with the Happy Definition stamp. I stamped the sentiment in Versamark and used clear embossing powder. Here's a look at the inside of the card.

Finally, here's a picture of the birthday boy with 51 (fffff-fifty plus one for good luck!) candles all aglow!

Happy birthday, Sal!

Supplies:
Cardstock: Papertrey Ink (White);
Patterned Paper: Cosmo Cricket (Cogsmo);
Stamps: Hero Arts (Happy Definition, Designer Woodgrain, Travel Journal;
Ink: Tim Holtz Distress Ink (Weathered Wood, Pumice Stone, Vintage Photo); Ranger (Coffee); Versamark;
Chipboard: Technique Tuesday Technique Tiles (Postage Frames); American Crafts Thickers (Jewelry Box);
Tools: EK Success border punch (Postage Stamp);
Misc.: Twine from my stash

Thursday, January 13, 2011

The Positive (and Negative) Thing About Masking!

This week, I created a card using the masking technique and for the first time ever, I used both the positive and negative masks. After finishing this card, all I can say is, I'm hooked on this technique! I love the rich textures and colors achieved by stamping and inking with the negative mask in place. Here's my card:

The colors for this card were inspired by the Moxie Fab Tuesday Trigger:


You can read more about the Tuesday Trigger and see the other projects it inspired at Moxie Fab World.


Now, here are some step-by step instructions for making this card. The first thing I did was create a positive and negative mask by stamping the flower on a piece of computer paper and cutting it out using an craft knife. (I found that the negative mask I first created with cardstock was a little too thick to stamp a pattern on the flower.) For the card, I stamped the background with Hero Arts' Dots and Flowers and then I stamped the large flower. With the negative mask in place, I stamped the flower with Old Letter Writing and colored it in with distress inks. I started with the lighter ink and added the darker inks as I went along until I got the color I wanted. I switched the negative mask for the positve and added the leaves. Once again, I used the negative leaf mask that I had created to color the leaves in. Here is a closer look at the flower:

You can see a full video tutorial of this technique at Hero Arts.

I mailed this card to my niece, Jennifer, for her birthday and it was only a day late. My One Little Word is really starting to kick in!

Supplies

Cardstock: Papertrey Ink (White, Chocolate); Stampin' Up! (Crushed Curry)

Stamps: Hero Arts (Dots and Flowers, Engraved Flower, Old Letter Writing, Big and Small Flowers, Scroll Frames & Messages);

Ink: Ranger (Coffee); Stampin' Up! (Crushed Curry); Tim Holtz Distress Inks (Spiced Marmalade, Scattered Straw, Vintage Photo, Shabby Shutters);

Embellishments: Queen & Company bling;

Tools: Fiskars Border Punch (Scallop Sentiment).

Saturday, January 8, 2011

The Starbucks Bag

So last week I showed you the card I made using a Bath & Body Works shopping bag. You can see the post here: http://eterno-lyyours.blogspot.com/2010/12/finding-new-use-for-christmas-shopping.html. Today I have a card that I made from a Starbucks shopping bag. Actually this pretty bag (which I forgot to take a picture of before I cut it up) was the one that inspired me to take a second look at all of my shopping bags. All that kraft and white...I was in paper craft heaven! Anyway, here is the card:
First I cut the tag from the bag using Papertrey Ink's Tag Sale 1 die. I stamped over the tag with a spray of leaves from PTI's Turning A New Leaf in green. The white leaves are part of the bag's design. Next, I created my background using the grid from PTI's Library Ledger and stamped more leaves over the grid. It was really easy to match the pattern and make the grid go half-way up the cardstock. Finally, I used the Mat Stack 2 stamps and matching die for the label and sentiment, and added the ribbon and bling! Here's a close-up look at the tag.

On the inside of the card, I stamped the sentiment and a smaller spray of leaves.
I mailed this birthday card to my sister who loves Starbucks coffee. I will have to ask her if she recognized the piece of bag I used on her card!

Supplies:
Cardstock: Papertrey Ink (White); Stampin' Up! (Wild Wasabi);
Stamps: Papertrey Ink (Turning a New Leaf, Library Ledger, Mat Stack 2, Birthday Basics);
Ink: Stampin' Up! (Wild Wasabi);
Tools: Papertrey Ink dies (Tag Sale 1, Mat Stack 2) EK Success punch (corner rounder);
Embelishments: Recollections (bling); Cosmo Cricket (ribbon);
Misc.: Starbucks shopping bag.

Thursday, January 6, 2011

One Little Word

For the last couple of years, Ali Edwards has been choosing "one little word" to focus on for the year. According to Ali's original post on the subject in 2007, one single word "can be a powerful thing. It can be the ripple in the pond that changes everything. It can be sharp and biting or rich and soft and slow." You can read Ali's original post here: http://aliedwards.com/2007/01/one-little-word-3.html. So instead of making a New Year's Resolution this year, I decided to join to join Ali by choosing my own "one little word."

organize

There are several definitions for this verb but these are the meanings that I plan to focus on:
  • to systematize;
  • to give organic structure or character to;
  • to put (oneself) in a state of mental competence to perform a task
I hope that by living the word "organize" and inviting it into my life, as Ali suggests, it will have ripple effects that positively impact my life throughout the year. I am well aware that focusing on my word will include the mundane like not letting the mail pile up and putting away the laundry as soon as the dryer buzzes. I'm hoping, however, that this will put an end to early morning searches for missing socks and actually give me more time to do the things I love like scrap and stamp.

If you would like to be truly inspired, check out the wordle Ali created with all of the words her readers have chosen by visiting her blog at http://aliedwards.com/2011/01/one-little-word-2011-the-words.html. And, if you are participating in this challenge, please leave a comment telling me what your "one little word" is for 2011.

And because I couldn't post without a project, here's a card I made back in November for my friend's son who turned 18. I was looking through my pictures to find a card with one little word on it but alas, I only found one with two. Here it is:
I created the background by inking Papertrey Ink's Fillable Frame #4 with Stampin' Up! Night of Navy ink. I then went back and filled in each frame with the "happy birthday" sentiment from PTI's Birthday Basics, stamping it once in Dusty Durango and twice in Crushed Curry. For emphasis, I die cut one image from Dusty Durango card stock and put ribbon behind it to anchor it.

Supplies:
Cardstock: Papertrey Ink (Dark Chocolate, Vintage Cream); Stampin' Up! (Dusty Durango);
Stamps: Papertrey Ink (Fillable Frame #4, Birthday Basics);
Inks: Stampin' Up! (Night of Navy; Dusty Durango, Crushed Curry);
Chipboard: Heidi Swapp;
Ribbon: Cosmo Cricket;
Tools: Papertrey Ink die (Fillable Frames #4); EK Success Corner Rounder punch.

Wednesday, April 22, 2009

Happy Earth Day!

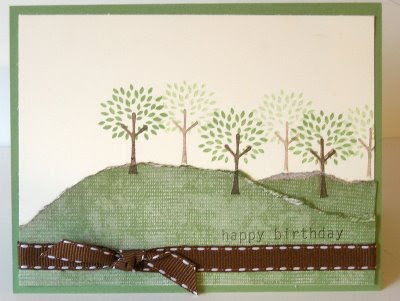
Here's a card that is suitable for an Earth Day post. It is made with the new Trendy Trees set from Stampin' Up! In keeping with Earth Day, the patterned papers came from my scrap bin. How's that for recycling! Here's the card:

I started with a standard size piece of SU Wilda Wasabi card stock cut down to 5.5 inches x 8.5 inches and scored it at 4.25 inches. I cut a piece of Very Vanilla card stock to measure 5.25 x 4
Next, I used my flexible BoBunny ruler to get the curves that I wanted for my patterned paper and tore the paper using the ruler as my guide. After inking the edges of the patterned paper and adhering it to the vanilla card stock, I stamped the tree trunks and leaves using my Stampamajig to line them up. The lighter trees were done using the stamping off technique. Finally I adhered my ribbon and stamped the sentiment.

Recently I undertook the arduous task of sorting all of my scraps. I put them in an accordion file by color. Now, my scraps are at my fingertips. And, no longer plagued by the thought of digging through the minefield that was my scrap bin, I am actually reaching for my scraps and saving paper (and money!) at the same time.

Ingredients: Stampin' Up! card stock (Wild Wasabi and Very Vanilla) and patterned paper; Stampin' Up! (Wild Wasabi) and Anna Griffin (brown) ink; Trendy Trees stamp; Bobbin Ribbon; BoBunny ruler and Stampamajig.

Friday, April 17, 2009

Sweet 16

Oh, Sweet 16! I remember turning 16. We all wore Gunnie Sax dresses to my party, sang Meatloaf's Paradise by the Dashboard Light at the top of our lungs, and danced to the BeeGees. My friends carried out the ritual of cutting off a lock of my hair, putting it into a brandy snifter with 16 pennies plus other memorabilia, and sealing the glass with wax. Anyway, back to the post. I have a Sweet 16 card to share with you today. This card was pretty simple to make... once I finalized the design. You would never know that from the pile of scraps left over from the numerous false starts I had. I think I spent more time on the cards that wound up in the trash than I did on this one. LOL! So, here is my card:

I started by stamping the swiss dot pattern onto my Stampin' Up! card stock with Versamark ink and heat embossing it. I added the patterned paper and covered the seem with my ribbon. Next, I arranged my alphabet stamps to spell out "Sweet." Again, I stamped using Versamark ink and embossed it. I ran that piece through my Cuttlebug using a Nestabilities die to cut and emboss the oval. I also cut the scalloped oval using my Nestabilities. Finally, I added the oval layers to my card using dimensional foam squares. Adding the bling probably took as long as it did to make the card but I think it was worth it. After all, it's not everyday you celebrate being Sweet 16.


As I was finishing this post, Melissa took one look at the card and said, "Mom, you scraplifted yourself." Check out this post: http://eterno-lyyours.blogspot.com/2008/11/all-she-wants-to-do-is-dance.html. I guess I did!
Ingredients: Stampin' Up! card stock; KI Memories Pop Culture patterned paper; Technique Tuesday (Swiss Dot) and Heidi Swapp (alphabet) stamps; K&Company Wedding stickers; Versamark ink; Stamp 'n Stuff Detail White embossing powder; Dashes, Dots & Checks ribbon; Michael's rhinestones; Nestabilities; and Cuttlebug.