Tuesday, March 6, 2012

Guest Designer at City Crafter

A while back, I asked to be the guest designer at the City Crafter Challenge Blog. My initial excitement turned into fear when I saw that the challenge was called "Seeing Double." The challenge was to use both the positive and negative of a die or punch. Now I most often use the positives of a die and I sometimes use the negative of the punch but I usually don't use them together. So I thought and I thought and I thought some more. Then, I saw this new patterned paper from My Mind's Eye 2012 CHA release:
I was drawn to the rows of butterflies and the paper quickly became my inspiration for my card. Here is my card:

Please note that Purple Cardstock + Glossy Accents + Cloudy Day =Major Photography Challenge!! I'm just saying!

To create the card, I stamped the background onto a piece of Rich Razzleberry cardstock using the same color ink. I added the sentiment in black ink. Next, I punched five butterflies from a scrap piece of paper and affixed them with removable adhesive to the cardstock. These served as positioning guides for me to punch the butterflies in a straight row. I backed the negative I created with a piece of patterned paper and added some coordinating paper strips to frame it. I used a 6x6 pad so that the scale was not too big. I adhered the punch butterflies to the card using Glossy Accents as my adhesive. I put rolled up glue dots under each wing to maintain the dimension. To make the butterfly wings stand out even more from the background, I coated each with Glossy Accents.

You can visit the City Crafter Challenge Blog to see what the other designers did and join in the fun. This week's prize is a Guest Design spot of your very own. If you do play a long, please link up to the comment section of my blog. I would love to see your project!

Supplies:
Cardstock: Papertrey Ink (Stamper's Select White); Stampin' UP! (Rich Razzleberry)'
Patterned Paper: Basic Grey (Sweet Threads);
Stamps: Hero Arts (Envelope Pattern, Luscious Frames);
Inks: Memento (Tuxedo Black); Stampin' UP! (Rich Razzleberry)
Tools: Martha Stewart punch (Classic Butterfly); Fiskars border punch (Scallop Sentiment);
Misc.: Recollections rhinestones

Monday, March 5, 2012

December Daily -- Days 4, 5 & 6

I am back today with three more pages from my December Daily. I have to admit that I was very excited to make these pages since they are a little out-of-the box for me. (Warning this is a long post with a lot of pictures!)

December 4th was an ordinary Sunday. Sal and I both woke up feeling a little under the weather. We stayed in and I made a stew for dinner. Nothing earth shattering to scrap about, right? Except, every season, when I make my stew for the first time, I have to call my mother and double check her recipe which I have improvised a bit over the years. I decided that a layout was in order. Since this was a small story, I wanted a small foundation so I grabbed a transparency and matching page from the Basic Grey Basics Take Note set. On the front is a picture of my stew simmering on the stove:

And on the back is the recipe. You can click on the picture to enlarge it if you are interested.
Yes, my secret ingredient in stew is ketchup!

On to Day 5. The first Monday in December. Again, no holiday pictures since I still wasn't feeling well. Luckily, my niece Jennifer had sent me a copy of Thomas' letter to Santa. I used it as the inspiration for my layout about Mark and Melissa's Santa lists. I used a Hambly transparency as the foundation so that it is easy to remove Thomas' letter to read it. Here's the page:
Journaling reads: The older Mark & Melissa get, the harder it is to get them to write their Santa list. This year, Mark texted me his list and Melissa never finished hers! For the record, Thomas' letter says:
Dear Santa,
I have been a very good boy this year. Would you please bring me Cars Duplo? I want everything with Cars. Boost is my favorite.
Thank you Santa!
Love, Thomas
To create the envelope, I stamped a background and the word "Believe"on a Maya Road kraft envelope, sealed it and then slit an opening along the top. Here's a closer look:
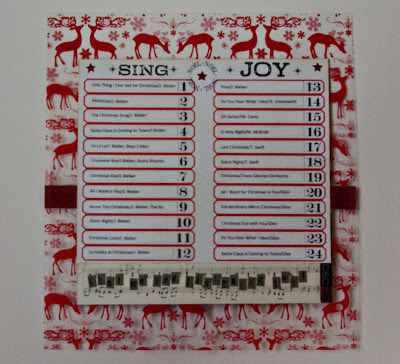
Since I used a transparency on Day 5, I needed to match my Day 6 layout on the back. I used a free printable which was intended to be used for a spool calendar as the inspiration for my page. I added the names of the songs that Melissa had downloaded from i-tunes for us to listen to in the car. Yes, I know there is a lot of Justin Bieber on that playlist! I added some rub-ons along the top of the page and some patterned paper and letter stickers along the bottom. Here's the page:
Note that after I took the picture, I realized I got carried away with the "o's" in the word to. That's what happens when you scrap when you have a glass of wine while you scrap. I'm just saying. Anyway, the spelling was corrected after the picture was taken. Oh, and for the record, the Simple Stories letter stickers did not include punctuation so I turned an "i" upside down for my exclamation point!
Finally, here's a peak at how these pages look in the album.
I love seeing all of the bits and pieces peaking out from behind the transparency.
It's so different from my traditional albums.
For a full list of supplies used on my December Daily, check this post.