Thursday, March 31, 2011

Layered Background Challenge

The Hero Arts challenge this month was to create a card with a layered background. I thought I would give it a try. Here's what I came up with:
.
To create this layered background, I first stamped the Happy Definition stamp using Vintage Photo Distress Ink. Next, I inked up an acrylic block with Antique Linen, Scattered Straw, Spiced Marmalade and Vintage Photo Distressed Inks, spritzed with water and "stamped" my cardstock. I repeated this step several times until the block was the color I wanted. (Be sure to start inking the block with the lighter colors first so as not to ruin your ink pads.) Once the color block had dried, I stamped the wildflowers with VersaMark ink, purposely letting the image go outside the inked mat for added impact. Finally I embossed the flowers with white Zing and distressed the edges. Here's a closer look:
The sentiment was also embossed. I used two different scallop edges to set it off.
Supplies:
Cardstock: Papertrey Ink (Fine Linen);
Patterned Paper: Basic Grey (Romani);
Stamps: Hero Arts (Happy Definition; Wild Flowers; Everyday Greeting);
Inks: Tim Holtz Distress Ink (Vintage Photo; Antique Linen; Scattered Straw; Spiced Marmalade); VersaMark;
Tools: Martha Stewart Edge Punch (Doily Lace); Fiskars Border Punch (Scallop Sentiment): Tim Holtz Paper Distresser;
Misc.: Recollection Adhesive Rhinestones; American Crafts Zing (white); twine from my stash

Wednesday, March 30, 2011

LOAD -- Day 9

Back in October 2009, Sal surprised me with tickets to see Brandi Carlile. Unfortunately, Sal's father was admitted to the ICU a few days before the concert. Needless to say, neither one of use was in the mindset to go to a concert. We tried giving the tickets away but to no avail so, as the saying goes, we ate them. Gulp! Well a year later, we tried it again and because date nights are so rare and this one was such a long time coming, I thought I should document it. Here's my layout:
:
The journaling reads: We originally had plans to see Brandi Carlile at the Beacon Theater in October 2009 but life got in the way and we didn't go. When you found out that she was opening for Sheryl Crow, you surprised me with tickets and we finally had our date night!
The inspiration for this layout came from the scrap of American Crafts music paper that I had in my stash. I thought it's peach tones matched the hues in the pictures, but I don't know what I was thinking when I bought some of the other papers in the collection because I didn't have enough complementary patterns and the ones that I did have totally clashed with the color of the ticket stub. Oh, what's a scrapper to do? The answer to that question is simple: create your own pattern paper. So that's exactly what I did. I used the Hero Arts Flourish Background stamp to create the yellow paper on the bottom of the layout. Not only was the pattern a good mix with the others, I thought that the yellow took some attention away from the color of the ticket. (If anyone from Ticketmaster is reading this, could you PLEASE find a more scrapper-friendly color for tickets? I'm just saying!

Anyway, the rest of the layout is pretty self-explanatory. I used a TRIPLE mat as the foundation for the layout. Then, after rounding the one corner, I added the pattern paper blocks. The strip across the middle is actually four papers. The line of hearts was fussy cut from a bigger pattern. For the title, I used my Cricut to cut the word "date" and stamped the letters for "night" on tickets that I created with a Papertrey Ink stamp and die. I added some more tickets and embellishments to the journaling area and sprinkled some hearts and rhinestones to create a visual triangle. Here's a closer look:

Supplies:
Cardstock: American Crafts;
Patterned Paper: American Crafts (Dear Lizzy); October Afternoon (Fly a Kite);
Stamps: Hero Arts (Flourish Background; Curly Alphabet); Papertrey Ink (Just the Ticket); Technique Tuesday (Today You By Ali Edwards):
Inks: Stampin' Up! (Crushed Curry); Ranger (Coffee);
Embellishments: American Crafts Flairs (Dear Lizzy); Basic Grey Bloomers (Oliver); Recollections (Adhesive Rhinestones);
Tools: Cricut by Provo Craft (Sweethearts cartridge); Fiskars border punch (Scallop Sentiment)

Tuesday, March 29, 2011

LOAD -- Day 8

Tonight I have another LOAD (Layout a Day) page to share. Finding time to scrap and blog everyday is really difficult. Add to this mix laundry, cooking and grocery shopping plus making cards for a busy month and, well, you can see why I took a little hiatus. I can also see why people plan for LOAD. Anyway, my LOAD hiatus is over and I am here to share another layout. This one was based on the sketch Jen Gallacher used for her February Stretch Your Sketch class over at Two Peas in A Bucket. I love Jen's sketches. They feel very authentic to me. While I may stretch them to fit my photos or page size, her sketches feel comfortable to me. Anyway, here's the sketch:
And here's my layout:
I felt it was so important to document the historic winter we had on Long Island both in words and photos. I knew the journaling would be long for this layout and Jen's sketch readily accommodated it. I typed the journaling out on the computer and then stamped a border. I think this is a layout we will keep coming back to for years on end whenever we say, "Remember that winter..." You can click on the photo below to read the journaling.
For the title, I used a mixture of Thickers and letters cut from my Cricut. Whenever I use my Cricut for a title, I stack multiple cuts to give my letters the look of chipboard. In this case, I cut the word "snow" three times from patterned paper and then I used the shadow cut on the black cardstock. Here's a closer look:
Basic Grey's Jovial collection had two identical snowflake patterns -- one black and one turquoise. To give the black paper a little pop of color, I cut out a few of the turquoise hexagons and placed them over the black. I really love the effect. One final detail to point out is the glitter snowflake embellishment. It's actually a gift wrap ornament that I picked up for $0.30 at Bath & Body Work's post-Christmas sale. It's amazing where you can find ideas for scrapbooking!
Supplies:
Cardstock: American Crafts (black); Papertrey Ink (Vintage Cream);
Patterned Paper: Basic Grey (Jovial; Basics); My Mind's Eye (Holly Jolly);
Stamp: Hero Arts (Dot Snowflake Border);
Ink: Technique Tuesday (Caribbean Sea);
Stickers: American Crafts Thickers (Sprinkles -- Chestnut);
Tools: Provo Craft Cricut (Winter Woodlands cartridge); Fiskars Border punch (Scallop Sentiment); Stampin' Up punch (Photo Corners);
Misc.: Little Yellow Bicycle Favorite Felt Stickers (Christmas Delight); Ribbon (Target); Glitter ornament (Bath & Body Works)

Monday, March 28, 2011

Project 12 -- February 2011

So far, so good. It's the second month of Project 12 and I'm hanging in there. I decided that three elements -- the calendar, the font for the months and the shape of the journaling block -- will stay the same for all 12 layouts. With that said, I have to admit that I struggled a little with this layout. I just couldn't get the sketch to work for my pictures and then, I let go of the sketch -- or at least some of it's elements -- and my mojo came back. The other thing that pulled this layout together was stitching the brown border around the page. Yes, I took out my Janome Sew Mini and learned how to change the bobbin just like I promised myself I would when I started the Finding My Way class at Big Picture Classes. (It helps to have ahusband who used to watch his grandmother sew. Thanks, Sal!) Once that stitched border was there, the rest of the pieces fell into place. I think stitching (especially brown!) may be my new favorite addition to my scrapbook pages! Anyway, here's the sketch:
And here's my layout:

The journaling is long so rather than retyping it, you can click on the photo below to read it.
I did some stamping on this page. To create this cluster by the calendar, I used what may possibly be my new favorite stamp set from Papertrey Ink. Label Basics has the look and feel of the October Afternoon sticker label stickers that I love so much but gives me the ability to customize them to match all of my papers. I may never put this set away! The "Take Note" sentiment is from a PTI's Fillable Frames #1. Since I hate cutting my stamps, I masked it so that the sentiment would cover two lines. I also stamped the heart using one of the patterned hearts from Hero Arts that matched my paper.
Okay, so remember how much I liked stitching the border. Well, I couldn't put my sewing machine away without stitching a border on the heart too!

Supplies:
Cardstock: American Crafts;
Patterned Paper: Jillibean Soup (Pasta Fagioli); My Minds Eye (Dreamy 2); Reminisce (Unwritten);
Stamps: Papertrey Ink (Label Basics; Fillable Frames #1); Hero Arts (Design Accents: Pattern Hearts);
Ink: Stampin' Up! (Riding Hood Red; Crushed Curry ); Ranger (Coffee);
Tools: Cricut cartridge (Designer Calendar); Spellbinders Nestabilities (Labels Four; Classic Circles); Fiskars Border Punch (Scallop Sentiment); EK Success Edge Punch (Double Embossed Dotted Lace);Janome Sew Mini;
Misc.: Ormolu Package Tags (Hooray Calendar); Making Memories buttons (Chloe's Closet).

Sunday, March 27, 2011

Delightful Dahlia

Just a quick post tonight to share a birthday card I made for my best stamping friend. I've had the idea for this card in my head ever since she gave me this stamp set for my birthday. Here's the card:
To create it, I cut a standard size card and, using my Martha Stewart Scoring Board, created a frame for my mat and stamped image. Before I began stamping, I used scrap paper to create a mask for the large flower and leaf, plus two masks for the smaller flowers. For the stamped image, I started stamping in the lower left-hand corner. After stamping the first large flower, I covered it with the mask and stamped the other large flower above it. Keeping the first mask in place, I added the small flower and then covered it with a mask before stamping the leaves. Finally, I masked the leaf and stamped the remaining flower. I stamped the sentiment and used a Spellbinders Nestabilities to cut it out. I adhered the stamped image to the mat, tied a ribbon and adhered it to the card front. Finally, I added some bling and the butterfly pin.

Because creating masks can be time consuming, I plan to keep these masks with the stamp set for future use!!

Supplies:
Cardstock: Papertrey Ink (White); Stampin' UP!
Stamps: Papertrey Ink (Delightful Dahlia; Vintage Labels);
Ink: Stampin' Up (Rich Razzleberry; Wild Wasabi); Ranger (Jet Black);
Tools: Martha Stewart Scoring Board; Spellbinders Nestabilities (Labes One);
Misc.: Recollections Rhinestone Stickers; Webster's Pages Butterfly Push Pins; Ribbon from my stash.

Thursday, March 24, 2011

Labor of Love

That's what this card was. Melissa's 13th birthday was on Monday and since she is my biggest fan, I knew I had to make her an extra special card. Besides that, she kept asking for a really special card. The pressure was on! I knew I wanted to ink up a new stamp for maximum impact on the birthday girl, so I chose the Hero Arts Circle Design stamp. I kept playing with different designs and different colors and finally after close to 3 hours (which is about half of the time I was in labor with Melissa!) I came up with this:
To create this card, I cut the circle base and patterned paper mat with my Cricut. I made the lacy die cut with my Cuttlebug and the Spellbinders Lotus Pendants Nestabilities. Next, I stamped the Hero Arts Circle Design three times -- once on the kraft and two times on the patterned paper. After fussy cutting the leaves of one of the patterned paper images and adhering them to the kraft layer, I centered the medallion from the Nestabilities to the other image and ran it through my Cuttlebug. I adhered the top two layers with foam dimensional adhesive and finished off the card with some bling, faux stitching and a ribbon. Here's a closer look:
I am back to doing a Layout A Day (LOAD) and will start posting my layouts again next week.

Supplies:
Cardstock: Papertrey Ink (Dark Chocolate); Stampin' Up! (Kraft);
Patterned Paper: Basic Grey (Perhaps);
Stamp: Hero Arts (Circle Design);
Ink: Ranger (Coffee); Signo Gel Pen (White)
Tools: Spellbinders Nestabilities (Lotus Pendants); Cricut (Wild Card cartridge);
Misc.: Recollections rhinestones; ribbon from my stash

Thursday, March 17, 2011

We Interrupt LOAD...

..to bring you a card. Unfortunately, I needed to make a sympathy card. Hands down, this is my least favorite kind of card to make and I usually procrastinate doing so. This one is late but it will be sent with love later today. Here it is:
To create the image, I used a technique that Jennifer McGuire introduced called smooching. She has a great video tutorial on her blog. Basically, you ink up the stamp, kiss it to another stamp and then slide or twist the inked stamp across the stamp it is kissing before lifting it up and stamping. For my card, I inked up the Hero Arts Poppy Background stamp and smooched with with the Stripes Pattern. I like that it looks like the flowers are against the siding of a house. Here's a close-up:
To finish off my card, I scored a border around the edge of the card, added some pearls to the stamped image, stamped a sentiment, and used some embroidery floss to make a bow. Here's a close-up:

Supplies:
Cardstock: Papertrey Ink (white); Stampin' UP! (Soft Sky; Blue Bayou);
Stamps: Hero Arts (Poppy Background; Stripes Pattern; Deepest Sympathy);
Ink: Stampin' UP! (Soft Sky; Blue Bayou);Ranger (Jet Black);
Tools: Martha Stewart Scoring Board;
Misc.: Recollections White Pearls; DMC white floss;

Wednesday, March 16, 2011

Disney World -- LOAD Day 7

Today's layout is a total scraplift. Some days, laundry needs to get done, dinner needs to be cooked so any craftiness has to be quick and easy. Anyway, when I first saw this piece of paper in my package of Basic Grey Basics...
...I had no idea what to do with it. I just didn't get it and figured I would never use it. Then I saw a layout by Sande Krieger, the paper's designer, and I couldn't wait to put it to use! Here's Sande's layout:

Here's my scraplift:
Let me tell you a little be about my layout. For the title, I combined Pink Paislee's chipboard alpha with a Christmas stamp! Yes the word "world" is actually part of the "joy to the world" sentiment in Technique Tuesday's Peace, Joy, Love by Ali Edwards set. I also substituted a Micky ears brad for the dot over the "i".
For the main photo block, I had two pictures that I had taken of Mark in the parks. Notice the bottom picture. It was an "imperfect" picture. There were two people in the foreground which took the focus off of Mark and his friend who were running to check in with their chaperones. Since I only had four pictures of Mark in the park, I knew I wanted to use this one, so I masked its imperfection with a journaling sticker.
I also make note of the fact that I do not have one picture of Mark looking at the camera in the journaling which reads: With the exception of the Electric Light Parade and a few rare sightings, we never saw you in Disney World. And that's just the way you wanted it!

The extra blocks gave me room to log the trip's itinerary (which included a 3:15 AM meeting time on Friday morning)...
...and Mark's entrance ticket. I also included the photo of the band marching (which I had used on a previous layout) with an arrow pointing to Mark.
Supplies:
Patterned Paper: Basic Grey (Basics Collection);
Stickers: Basic Grey (Basics, Wander); Pink Paislee (Denim Weathered Wood Chipboard Alphas);
Stamps: Technique Tuesday (Peace, Joy Love by Ali Edwards; Summer Words; It's a Date);
Ink: Tim Holtz Distress Ink (Pumice Stone); Stampin' UP! (Riding Hood Red);
Embellishments: Disney brad from my stash;
Pen: EK Success Zig Writer (Black).

Tuesday, March 15, 2011

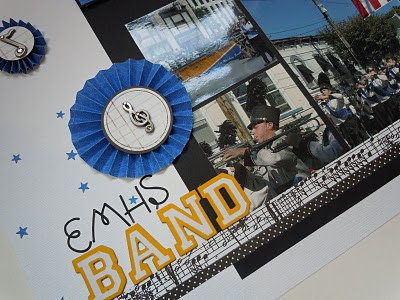
EMHS Band -- LOAD Day 6!

What do you get when you mix a fabulous sketch designed by Allison Davis with a Moxie Fab World Cityscapes Are On The Rise Challenge? A layout that came together with relative ease. Here's the sketch:
You can find more of Allison's sketches on her blog. The thing I love most about her sketches is that the accommodate lots of pictures I kept the placement of the pictures the same as they are in the original sketch design but I flipped the mat and, with a little help from my Cricut, I turned the swoosh from the bottom of the page into a cityscape at the top of the page. Here's my layout:
Here's a close-up of the journaling block and the cityscape. I cut it out using both the regular cut and the block shadow cut so that it would really pop.
The journaling reads: October 2010-- Mark, what a busy weekend you had. First, you marched in the Columbus Day Parade in Huntington on Saturday and then in New York City on Monday. I hope you always remember the excitement you felt when you first stepped off onto Fifth Avenue and started to play for the cheering crowd. All you hard work and practicing paid off since EMHS placed third in the competition!

I've had those music brads in my stash forever and thought now was the time to use them. However, when I matted them on just the labels and adhered them to the layout, they seemed like they were missing something. That's when I got the idea to make my own rosettes using this tutorial. It was really simple to do but I would not recommend making them without a scoring board!
I'll be back tomorrow to share my 7th LOAD layout.

Supplies:
Cardstock: American Crafts
Patterned Paper: Doodlebug (Blue Jean Filigree): American Crafts (Dear Lizzy Friendly Finch); Making Memories (Black Small Dots); 7 Gypsies (Kilburn);
Tools: Cricut (Plantin School Book): Martha Stewart Edge Punch(Stars); Martha Stewart Scoring Board;
Stickers: American Crafts (Sarah Script Black); American Crafts Thickers (ABC Letterman Mustard); Basic Grey (Basics Sticker labels);
Embellishments: Music brads from my stash.

Sunday, March 13, 2011

Christmas in Brooklyn -- LOAD Day 5

Quick post tonight to share the results of my fifth day doing a Layout a Day (LOAD). The layout was inspired by a sketch from a free Two Peas in a Bucket class called 4x6 Photo Love. I love this sketch and think I will be using it again since I scrap a lot of 4x6 photos! Here's my layout:
Journaling reads: A spontaneous stop in Brooklyn to see the decorations turned out to be a highlight of the 2010 holiday season. This stop was so spontaneous that I didn't even have m camera with me. The pictures are from Sal's cell phone.

To created this layout, I used one of my favorite papers from Basic Grey's Basics collection as a foundation. These papers seem to be showing up a lot on my layouts lately. They really have become one of my Go-To supplies. Next, I cut the different pattern blocks from the My Mind's Eye patterned papers, distressed the edges with some distress ink and adhered them to the foundation. For the title, I cut the glittered shape from one of the patterned papers, stamped one part of the title and used Thickers for the other. I really like the look of multiple fonts on a title.
To ground the upper corner of the layout, I fussy cut the banner from another piece of patterned paper. I can't believe I cut up one entire sheet for that small banner. Oh well!
Finally, I added my journaling on the bottom right corner. After writing it free-hand, I felt that it too needed to be grounded so I stamped some faint journaling lines with distress ink.
Well, the company is gone, the good china is put away and I have leftovers for dinner tomorrow night so it will be back to LOAD on Monday!

Supplies
Patterned Paper: Basic Grey (Basics); My Mind's Eye (Lost & Found Union Square);
Ink: Tim Holtz Distress Ink (Antique Linen; Vintage Photo): Ranger Jet Black):
Stamps: Technique Tuesday (Initially Yours - C; Initially Yours - The Little Words); Papertrey Ink (Library Ledger);
Stickers: American Crafts Thickers (Dear Lizzy);
Bling: Recollections Gems

Friday, March 11, 2011

So Grateful -- LOAD Day 4

In addition to tackling new layouts, I decided to work on some unfinished pages as part of my commitment to LOAD (Layout A Day). This page was from a Creating Keepsakes class that I took at last year's convention. Here it is:
Journaling reads: We were very grateful to have Thomas and Paul spend their first Thanksgiving with us!

As I so often do when working on class pages, I tried to make this page my own and in doing so, I had an "Aha" moment. I like patterned paper -- lots of it. I also like journaling labels. And, I DON'T like big orange silk flowers on my layouts. Ha! So after finishing the layout according to the printed class instructions (but without the BIG, orange silk flower which should have been put on the right side of the page below the title) I dug through my stash and found the yellow polka dot fabric paper. It only took a half-inch-wide strip on each page for me to feel that the page looked more like mine. I also added the stamped journaling stickers and the title which I cut with my Cricut.
One thing we id in class that I really like is added a dot of red Stickles to the center of each flower. I really like the dimension and sparkle it lends the page.

I'm so looking forward to having those sweet baby boys (and their moms and dad) over for Easter. I hope the weather is nice enough for an egg hunt!

Supplies:
Cardstock: Bazzill (Kraft, Apricot, Fresh);
Patterned Paper: Basic Grey (Corsage); American Crafts (Dear Lizzy);
Stamps: Inkadinkado (Flourish); Papertrey Ink (Fillable Frames #4));
Ink: VersaMark; Ranger (Coffee);
Stickers: October Afternoon (Various Collections);
Tools: EK Success Punch (1 3.4 circle); Papertrey In die (FillableFrames #4);
Misc.: Ranger Stickles (Fired Brick Red.)

Thursday, March 10, 2011

Marching in Disney -- LOAD Day 3!

Mark was lucky enough to have the opportunity of a lifetime last month when he and his high school marching band led the Electric Light Parade. Since it's not everyday that my son gets an opportunity like this, Sal and I pulled Melissa out of school for a day and flew down to Disney for the weekend. After all, someone had to take pictures and scrapbook this event! Here's my layout:


The band stepped off at around 6:45 on Saturday night so we started scoping out a front row viewing spot at 5:30. Between the band's quick marching pace and the darkness that had settled over Main Street, all my scoping was for naught as my pictures did not turn out great. I accounted for this in my journaling which reads: Mark, it was a thrill to watch you march in the Electric Light Parade. You marched so quickly, it was really just a blur.

I am not one for themed papers and embellishments anymore (which is a shame since I have a stash full of them that I will probably never use) but when I saw this marching Micky, I couldn't resist buying it for this page. With that being the inspiration for my page, I pulled out my Disney papers and cut them into strips for the right side of the page. I added two vertical punched strips (one black and one striped) to tie the two sides of the layout together.
Because I wanted to emphasize the musical aspect of this trip, I stamped one of the yellow dotted strips with the Hero Arts Music Background stamp. You can see a close-up below. I finished the layout with some Basic Grey stickers from the Basics collection. If you look closely at the bottom, you will see that I stamped one with a sentiment that reads: the wonderful bits and pieces of life.
Well that's all for LOAD - Day 3!

Supplies
Cardstock: American Crafts (black);
Patterned Paper: Basic Grey (Basics); EK Success (Disney);
Letter Stickers: American Crafts Remarks Stickers (Sarah Script White); Basic Grey (Micro Monograms);
Embellishments: EZ Laser Designs (Disney Title); EK Success Disney (Mickey Parade Dimensional Stickers); Basic Grey (Basics Sticker Labels); Creative Imaginations Epoxy Sticker;
Stamp: Hero Arts (Music Background); Technique Tuesday (Bits and Pieces by Ali Edwards):
Ink: Ranger (Jet Black);
Tools: Fiskars Border Punch (Scallop Sentiment); All Night Media (Small Mickey Head Punch).

Wednesday, March 9, 2011

Finding My Way

I know I have been conspicuously absent from my blog for the last week but I swear, I have a good reason. You see, I won a spot in Karen Grunberg's Finding Your Way class. This 8-week course is a process-based class designed to explore different areas of scrapping in hopes of finding what Karen calls your "authentic self." Anyway, one of the things that Karen encouraged the first week was to embrace LOAD (Layout A Day) for a month. Well, I never in my wildest dreams ever considered doing LOAD. As you read in last week's post, I couldn't even commit to Project 12 so a layout a day for 30 days seemed impossible. However, the more I was reading, the more it made sense. So, I organized my photos, streamlined the way I printed them and started scrapping. And yes, I made 7 layouts in 7 days. I just didn't have the time to take pictures and blog about them before now. So here goes!

First up is a layout I did using a digital collage that I made for free using an online coupon at Walgreen's. The photo is a little dark, but in addition to learning to streamline my scrapping process, I am also trying to embrace imperfection. So here it is:


Journaling reads: Our holiday visit with the Slomovitz's was a little different this year. After enjoying pizza and Christmas cookies at our house, we went to an Islander game and sat in a luxury box!

To create the layout, I first trimmed about a half inch from two sides of the ledger paper and adhered that to a kraft cardstock foundation. Next, I cut squares (or boxes!) from different patterned papers and randomly adhered them inside the grids at the bottom of the ledger paper. The photo collage was printed with a white mat. I added orange and blue mats to replicate the team colors. Since the layout has such a large photo block, I mixed large and small letters for my title and I used a journaling sticker to ground the Tiny Type letters.
At the top of the page, I adhered my ticket stub to some journaling stickers to create a cluster of embellishments. To ground it, I used a thin strip of paper that was punched with the EK Success Postage Stamp punch. And yes, I overcame my fear and pulled out my sewing machine for this one! I duplicated the punched strip and sewing to ground the bottom of the layout and finally added a few threaded buttons for texture and dimension.

So that's it for LOAD Day 2. (LOAD Day 1 was actually my Project 12 layout which I shared last week. ) There will be plenty more layouts to share as I did a layout a day for seven days. I am taking this week off from it since I am preparing for Melissa's birthday. I do, however, plan to start it up again next week!

Supplies:
Cardstock: Bazzill (kraft);
Patterned Paper: My Minds Eye (Lush 2);
Stickers: October Afternoon (various collections); Cosmo Cricket Tiny Type; American Crafts Thickers (Dolce -- Apricot)
Tools: EK Success Edge Punch (Postage Stamp); Janome Sew Mini;
Buttons: Making Memories (Chloe's Closet);
Pen: EK Success Zig (black)