Monday, January 31, 2011

Adventures in Babysitting

If you are ever in need of inspiration, check out the monthly classes at Two Peas in a Bucket. That's what I did for this layout. Actually, the inspiration for this layout came from two classes, namely Nichol Magouirk's Scrapbook Stamping and Jenn Gallacher's Stretch Your Sketch. Here's Jenn's sketch:
And here's my layout:

As soon as I saw the sketch, I thought of using this series of pictures. I just love how Thomas is studying the page of his book, then noticing something and asking Melissa about it!

The journaling reads: October 2010 -- Two or three nights each year, Melissa and I drive into Manhattan to babysit for Thomas. It's a win-win situation! Michael and Jennifer get a night out on the town while Melissa and I get some precious one-on-one time with Thomas. Reading stories, singing nursery rhymes, playing with blocks and trains is all an adventure when we do it with Thomas!

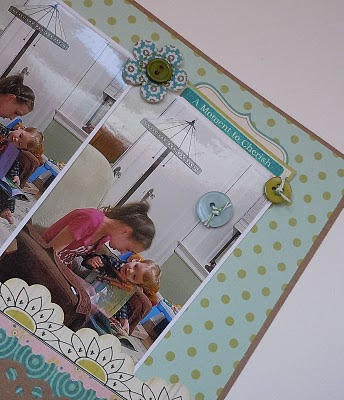
Nichol's challenge this month was to dig out the word or phrase stamps to create a title or border on a layout. I used Technique Tuesday stamps to stamp a border under the journaling. The stamp reads: This moment. This story. This day. This experience. This life.
I also stamped on a label sticker, layered it on another sticker and added a flower and some buttons to ground the pictures.
I love stamping and I love sketches so I think I will be playing along with Two Peas all year long!

Supplies:
Cardstock: Bazzill (Kraft);
Patterned Paper: Sassafras Lass (Indie Girl); October Afternoon (Farm Fresh); My Mind's Eye (Just Dreamy 2);
Stickers: Sassafras lass (Indie Girl); October Afternoon (Thrift Shop, Farm Fresh); Making Memories (Tiny Alphas); American Crafts Thickers; Basic Grey Bloomers (Pyrus);
Stamps: Technique Tuesday (Ali Edwards Today You, Little Labels ); Hero Arts (Design Accents: Patterned Hearts);
Ink: Stampin' Up! (Taken with Teal); VersaMark;
Tools: EK Success Edger Punch (Postage Stamp); Martha Stewart Edge Punch (Scallop Dot);
Misc.: Martha Stewart twine; Making Memories buttons (Chloe's Closet).

Tuesday, January 25, 2011

Papertrey January Blog Hop Challenge

Okay, so let me go on the record and say that for all intents and purposes, my Papertrey Ink stamps are not collecting dust. I only found these wonderful stamps about a year ago and surely that's not enough time to collect dust! There are, however, some stamps that see more ink than others. So with that said, when I saw that Papertrey Ink's January Blog Hop Challenge was to use a PTI stamp that has yet to see ink or was collecting dust, I knew I was up for the challenge! Here's the card I made:

I used a sentiment stamp from Birthday Basics to create the background. To start, I cut a standard sized card and used my Martha Stewart Scoring Board to create the decorative border. Next I cut a piece of white cardstock small enough to fit inside the border and penciled in some grid lines. I started stamping in the center of white cardstock and worked my way out (left and right), then down and up changing the color of ink each time. (Make sure your ink is dry before erasing the grid lines!) When the background was complete, I adhered it to my card. Next, I added the die cut labels on dimensional adhesive and personalized it for the occasion with Thickers. A little bling gives it the finishing touch!
Here's a look at the inside of the card:

Be sure to check out all of the fabulous projects created for this blog hop. Also, there is some blog candy over at Moonlight Creations!
Supplies:
Cardstock: Papertrey Ink;
Specialty Paper: American Crafts (blue glitter);
Stamps: Papertrey Ink (Birthday Sentiments, Fillable Frames #4);
Ink: Ranger (Jet Black); Stampin' Up! (Tempting Turquoise, Pink Passion, Lovely Lilac);
Chipboard: American Crafts Thickers (Lax);
Embellishments: Prima (bling);
Tools: Papertrey Ink dies (Limitless Labels, Fillable Frames #4); Martha Stewart Scoring Board

Thursday, January 20, 2011

In Just 10 Years...

In looking over my blog, I realize that I have been posting lots of cards lately and not too many scrapbook pages. In reality, I scrapbook far more than I spend time making cards, unless I am in a card-making frenzy like I have been this last month. So, why do I spend more time on my blog talking about the cards I make than the pages I scrap. The answer is rather simple. Cards are easier to photograph. So, with that said, I have a lot of catching up to do on my blog. First up, a layout I made last January to mark the new decade. Surprisingly, I like this layout as much now as I did when I made it!

For this layout, I wanted to tell the story about what Mark and Melissa had each accomplished in the first decade of this century. To accomplish that I created a separate journaling blocks for each of them and used pictures from the 2000 and 2010 holiday seasons. For added emphasis on how much they grew, I had them hold a tile that they had made with their hand prints on January 1, 2000 in the December 2010 picture.

The journaling reads:
How time flies! Mark, in just 10 years, you went from kindergarten to 9th grade. You went from learning to read to reading Dickens, Poe and Homer. You learned to ride a bike, ski, in-line skate and skateboard. You can play the trumpet, dive off the high board, and run a 5k race. You lost your baby teeth and had your braces on and off. You went from playing with Legos to playing the XBox. You went from being a little boy to shaving.
Melissa, in just 10 years, you went from playing with dolls to helping with your baby cousins. You learned to ride a bike, ice skate, swim, ski and play the clarinet. You can dance ballet, tap, jazz and modern. you got your first pair of high-heel shoes and your first Coach pocketbook. You went from singing nursery rhymes to singing every song on the radio. You went from being a toddler to being a young lady.
One detail I would like to point out is the Glossy Accents and jeweled eyes I added to several of the birds. This just gave the page added texture and dimension.
Supplies:
Cardstock: American Crafts:
Patterned Paper: Cosmo Cricket (Earth Love);
Letters: American Craft Thickers; Making Memories Tiny Alphas;
Embellishments: Chatter Box (Chipboard bird); Prima (flocked bird); Pink Paislee (rub-on); Cosmo Cricket (ribbon); Recollection jewels;
Tools: EK Success Border Punch (embossed Curve Edger Punch);
Misc.: Twine and buttons from stash.

Saturday, January 15, 2011

Nifty at 50!

I have no recollection of my parents turning 50. No recollection at all! In fact, the first person I can remember turning 50 was a woman, Elaine, who sat at the next desk over at my first real job nearly 25 years ago. And, although 50 seemed "old" to me then, Elaine was in no way "old." What I do remember most vividly about Elaine turning 50 was that she purposefully stuttered every time she said ffffff-fifty. It became quite a joke around the office. Fast forward 24 years (and I do mean fast forward) and now I have a husband who is fffffffff-fifty! Yes, Sal celebrated his 50th birthday earlier this week and here's the card I made for him:
To make this card, I covered a standard size base with pattern paper. I cut the blue paper 1/4 inch smaller and stamped it with the new Hero Arts Happy Definition cling stamp. Next I inked up the Technique Tuesday tile and stamped that with the wood grain pattern. I distressed all of the edges in keeping with the 50 theme. LOL! I stamped a sentiment from a travel set on the red strip and finished off the edges with a postage stamp punch.

For the inside of the card, I cut a square mask. After inking the center of the square with blue, I stamped lightly with the Happy Definition stamp. I stamped the sentiment in Versamark and used clear embossing powder. Here's a look at the inside of the card.

Finally, here's a picture of the birthday boy with 51 (fffff-fifty plus one for good luck!) candles all aglow!

Happy birthday, Sal!

Supplies:
Cardstock: Papertrey Ink (White);
Patterned Paper: Cosmo Cricket (Cogsmo);
Stamps: Hero Arts (Happy Definition, Designer Woodgrain, Travel Journal;
Ink: Tim Holtz Distress Ink (Weathered Wood, Pumice Stone, Vintage Photo); Ranger (Coffee); Versamark;
Chipboard: Technique Tuesday Technique Tiles (Postage Frames); American Crafts Thickers (Jewelry Box);
Tools: EK Success border punch (Postage Stamp);
Misc.: Twine from my stash

Thursday, January 13, 2011

The Positive (and Negative) Thing About Masking!

This week, I created a card using the masking technique and for the first time ever, I used both the positive and negative masks. After finishing this card, all I can say is, I'm hooked on this technique! I love the rich textures and colors achieved by stamping and inking with the negative mask in place. Here's my card:

The colors for this card were inspired by the Moxie Fab Tuesday Trigger:


You can read more about the Tuesday Trigger and see the other projects it inspired at Moxie Fab World.


Now, here are some step-by step instructions for making this card. The first thing I did was create a positive and negative mask by stamping the flower on a piece of computer paper and cutting it out using an craft knife. (I found that the negative mask I first created with cardstock was a little too thick to stamp a pattern on the flower.) For the card, I stamped the background with Hero Arts' Dots and Flowers and then I stamped the large flower. With the negative mask in place, I stamped the flower with Old Letter Writing and colored it in with distress inks. I started with the lighter ink and added the darker inks as I went along until I got the color I wanted. I switched the negative mask for the positve and added the leaves. Once again, I used the negative leaf mask that I had created to color the leaves in. Here is a closer look at the flower:

You can see a full video tutorial of this technique at Hero Arts.

I mailed this card to my niece, Jennifer, for her birthday and it was only a day late. My One Little Word is really starting to kick in!

Supplies

Cardstock: Papertrey Ink (White, Chocolate); Stampin' Up! (Crushed Curry)

Stamps: Hero Arts (Dots and Flowers, Engraved Flower, Old Letter Writing, Big and Small Flowers, Scroll Frames & Messages);

Ink: Ranger (Coffee); Stampin' Up! (Crushed Curry); Tim Holtz Distress Inks (Spiced Marmalade, Scattered Straw, Vintage Photo, Shabby Shutters);

Embellishments: Queen & Company bling;

Tools: Fiskars Border Punch (Scallop Sentiment).

Saturday, January 8, 2011

The Starbucks Bag

So last week I showed you the card I made using a Bath & Body Works shopping bag. You can see the post here: http://eterno-lyyours.blogspot.com/2010/12/finding-new-use-for-christmas-shopping.html. Today I have a card that I made from a Starbucks shopping bag. Actually this pretty bag (which I forgot to take a picture of before I cut it up) was the one that inspired me to take a second look at all of my shopping bags. All that kraft and white...I was in paper craft heaven! Anyway, here is the card:
First I cut the tag from the bag using Papertrey Ink's Tag Sale 1 die. I stamped over the tag with a spray of leaves from PTI's Turning A New Leaf in green. The white leaves are part of the bag's design. Next, I created my background using the grid from PTI's Library Ledger and stamped more leaves over the grid. It was really easy to match the pattern and make the grid go half-way up the cardstock. Finally, I used the Mat Stack 2 stamps and matching die for the label and sentiment, and added the ribbon and bling! Here's a close-up look at the tag.

On the inside of the card, I stamped the sentiment and a smaller spray of leaves.
I mailed this birthday card to my sister who loves Starbucks coffee. I will have to ask her if she recognized the piece of bag I used on her card!

Supplies:
Cardstock: Papertrey Ink (White); Stampin' Up! (Wild Wasabi);
Stamps: Papertrey Ink (Turning a New Leaf, Library Ledger, Mat Stack 2, Birthday Basics);
Ink: Stampin' Up! (Wild Wasabi);
Tools: Papertrey Ink dies (Tag Sale 1, Mat Stack 2) EK Success punch (corner rounder);
Embelishments: Recollections (bling); Cosmo Cricket (ribbon);
Misc.: Starbucks shopping bag.

Thursday, January 6, 2011

One Little Word

For the last couple of years, Ali Edwards has been choosing "one little word" to focus on for the year. According to Ali's original post on the subject in 2007, one single word "can be a powerful thing. It can be the ripple in the pond that changes everything. It can be sharp and biting or rich and soft and slow." You can read Ali's original post here: http://aliedwards.com/2007/01/one-little-word-3.html. So instead of making a New Year's Resolution this year, I decided to join to join Ali by choosing my own "one little word."

organize

There are several definitions for this verb but these are the meanings that I plan to focus on:
  • to systematize;
  • to give organic structure or character to;
  • to put (oneself) in a state of mental competence to perform a task
I hope that by living the word "organize" and inviting it into my life, as Ali suggests, it will have ripple effects that positively impact my life throughout the year. I am well aware that focusing on my word will include the mundane like not letting the mail pile up and putting away the laundry as soon as the dryer buzzes. I'm hoping, however, that this will put an end to early morning searches for missing socks and actually give me more time to do the things I love like scrap and stamp.

If you would like to be truly inspired, check out the wordle Ali created with all of the words her readers have chosen by visiting her blog at http://aliedwards.com/2011/01/one-little-word-2011-the-words.html. And, if you are participating in this challenge, please leave a comment telling me what your "one little word" is for 2011.

And because I couldn't post without a project, here's a card I made back in November for my friend's son who turned 18. I was looking through my pictures to find a card with one little word on it but alas, I only found one with two. Here it is:
I created the background by inking Papertrey Ink's Fillable Frame #4 with Stampin' Up! Night of Navy ink. I then went back and filled in each frame with the "happy birthday" sentiment from PTI's Birthday Basics, stamping it once in Dusty Durango and twice in Crushed Curry. For emphasis, I die cut one image from Dusty Durango card stock and put ribbon behind it to anchor it.

Supplies:
Cardstock: Papertrey Ink (Dark Chocolate, Vintage Cream); Stampin' Up! (Dusty Durango);
Stamps: Papertrey Ink (Fillable Frame #4, Birthday Basics);
Inks: Stampin' Up! (Night of Navy; Dusty Durango, Crushed Curry);
Chipboard: Heidi Swapp;
Ribbon: Cosmo Cricket;
Tools: Papertrey Ink die (Fillable Frames #4); EK Success Corner Rounder punch.