Monday, February 28, 2011

Project 12 -- Take 2

Two years ago, I started Project 12. I thought it would be a great way to document a year in my life. It wouldn't require the diligence or time that Project Life requires yet I would have a comprehensive look at our what we did (big and small) by year's end. Sounds good right? It was...for the first three months. Unfortunately I picked a format that didn't really work for me. I liked my January layout but by February and March, I started feeling very restricted by this one-page, mini picture format. Oh, and the papers I chose really seemed so fussy for this snapshot of everyday life. After turning 40, I no longer finished a book just because I started it. I had to enjoy the book in order to finish it. And, since I was no longer enjoying Project 12, I abandoned it like a bad book. That's not to say that I didn't like the idea of it. I just didn't like what I was doing with it. So , I sat on the sidelines for a year and a half and watched what other people -- most notably, Davinie Fiero -- did with Project 12. I watched and I learned. Today, I am back with my Project 12 -- Take 2! Here's me layout:
Sorry for the quality of these photos. I usually like to take my pictures in natural light but today was the dreariest of days! For this layout, I used Becky Fleck's phenomenal sketch:
As you can see, I stuck pretty closely to the sketch, only adjusting it to accommodate my picture size. Here's a close-up of the first page.
Davinie's use of chipboard frames on her January layout inspired me. I used the same technique to fill up my blocks of white space. I think this added more visual interest than a rectangular block of patterned paper.

Since I've been trying to use my stamps more, I punched out a file tab and stamped the words using two different ink colors.
Here's a close-up of page two. Some elements to note are the calendar tag from Ormolu, the shaped mat on the journaling, and the script title which I created by adhering four Cricut cuts together to create the chipboard look. I plan to use these elements on each of my Project 12 layouts this year to give them a more cohesive look. Since the journaling is quite lengthy, I won't retype it here. Instead, you can click on the picture to enlarge it.
I'm really happy with how this layout turned out. I don't think I'll be giving up on Project 12 any time soon!

Supplies:
Cardstock: American Crafts;
Patterned Paper, Stickers and Brads: Basic Grey (Basics, Oliver and Olivia):
Buttons: Making Memories;
Tools: Martha Stewart Edge Punch (Scallop Dot); Fiskars Border Punch (Scallop Sentiment); Spellbinders Nestabilities (Labels Four); Cricut cartridge (Designer Calendar); McGill punch (File Tab);
Stamps: Technique Tuesday (Everyday Life by Ali Edwards);
Ink: Ranger (Jet Black); Technique Tuesday (Tempting Turquoise);
Misc: DMC Floss; Ormolu Package Tags (Hooray Calendar).

Monday, February 21, 2011

Invitation Inspiration, Make It Monday Challenge & Blog Candy Winner

When Melissa received this invitation in the mail...

... I immediately knew that I wanted to use Scor Tape to add glitter to a card. Lucky for me, this is the Make It Monday Challenge over at Papertrey Ink. Here's the card I created inspired by this invitation:

To create this card, I cut a standard sized card out of white cardstock and rounded the corners on the right side. This card has a lot of layers and I just started building from the left. First<>
I added the scallop layers to the top of the cardstock that was stamped with the background and used ribbon to hide the seam. Next, I added more layers (three to be exact) for the sentiment. For the inside of the card, I created a sentiment on my computer, die cut it to match the front and added the stamped border and leaf accent. Here's a look at the inside:
Now before I go any further with this post, I want to sing the praises of Fiskar's customer service. As I mentioned above, my border punch broke. I was very surprised when it did break because the paper I was punching was very thin and didn't put any pressure on the punch. Anyway, I contacted Fiskars, filled out a form on-line, sent them a picture of my punch and Voila! I had a new punch delivered to my door within the week!
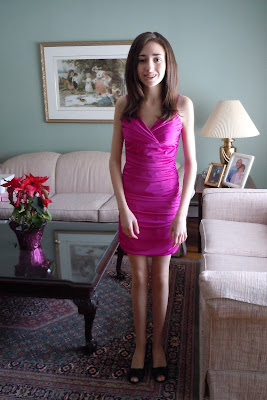
Just so happens that the dress Melissa chose for this Bat Mitzvah also matched the invitation. LOL! Here's my beautiful daughter all dressed up and looking way too grown up for her father's taste:
Now, if you have read this far down, it's time to announce the winner of my Valentine's day Blog Hop Blog Candy.

Random Integer Generator

Here are your random numbers:

3

Timestamp: 2011-02-22 03:58:09 UTC


This means the winning comment belongs to Briana!
Briana said...

What a great photo! And 22 years? That's awesome!
My favorite Valentine's Day was when DH made me a "fancy" dinner at home all by himself. It was a total surprise!

February 11, 2011 5:29 AM

Briana, you have until Sunday, February 27th to claim your prize. Please e-mail me your full name and mailing address.

Supplies:

Cardstock: Papertrey Ink;

Patterned Paper: Making Memories;

Stamps: Hero Arts (Large Fabric Design); Papertrey Ink (Mat Stack 2 Collection; Mat Stack 1 Collection);

Ink: Ranger (Jet Black); Stampin' Up! (Pink Passion);

Tools: Fiskars Border Punch (Scallop Sentiment): Martha Stewart Border Punch (Modern Garland); Papertrey Ink Dies (Mat Stack 1; Limitless Labels); Scor Tape;

Embellishments: Martha Stewart glitter; Michael's ribbon.

Wednesday, February 9, 2011

Invitation Inspiration

If you are here for the CK Valentine's Day Blog Hop, scroll down one post!


Bat Mitzvah season has begun! It's only the middle of February and Melissa has already attended three Bat Mitzvah celebrations and I have been told that that there are more to come. Rather than mass produce one card, I decided to personalize each by drawing my inspiration from the invitation. So, here's the invitation for one of the parties she recently attended:
And here's the card it inspired:

As you can see, I used the same colors as the invitation thanks to Papertrey Ink! Bet the Bat Mitzvah girl didn't know she was picking Aqua Mist when she chose the paper for her invitation! LOL! I used a Hero arts stamp to recreate the swirl pattern from the invitation on the top half of my card. For the bottom, I embossed the dotted patterned onto my cardstock, cut it into strips and punched to create the ruffled layers. The sentiment background of the sentiment was also embossed using PTI's Mat Stack 1 Collection. I have a feeling that this set is going to be my "go to" stamp set! I finished off the top of the mat with a Martha Stewart doily tag which I cut in half.
I will have the next installment of Invitation Inspiration next week.

Supplies:
Cardstock: Papertrey Ink (White, Aqua Mist);
Stamps: Papertrey Ink (Mat Stack 1 Collection; Mat Stack 3 Collection -- sentiment); Hero Arts (Flourish Background; Raindrop Background);
Ink: Versa Mark; Ranger (Jet Black);
Embossing Powder: American Crafts Zing! (white); Stamp 'n Stuff (Sterling Silver)'
Tools: EK Success Border Punch(Double Embossed Dotted Lace); Papertrey Ink die (Mat Stack 1);
Embellishments: Martha Stewart tag; Recollections rhinestones; ribbon from my stash

Tuesday, February 8, 2011

Valentine's Day Blog Hop and Blog Candy!

Welcome to the Club CK Valentine's Day Blog Hop! You should be arriving here from Gina's blog. We've all created projects --18 in all-- featuring Valentine's Day or love. Hope you are inspired!
If at any time you get you get lost, hop on back to Amanda's blog. Also at the end of the hop, head on back to Amanda's Blog. I hear she has some sweet Valentine's Day blog candy! And, if you read through to the end of my post, you will find some blog candy here as well! Now on to my project:
This picture was taken of Sal and I on our cruise last summer. It was Casual Portrait Night, the kids were off with their friends and we found our favorite photographer who had coaxed a natural smile out of Mark on the previous night. Anyway,the shoes came off and Voila! We have what Sal calls our Matt Lauer/Katie Couric photo. (I keep reminding Sal that Meredith Vieira is Matt's sidekick but he is out of the house long before the Today Show starts.

Since the photo was very white, I wanted it to blend into the background so that the focus of the page would be on us. I thought that the Dear Lizzy Hearts worked beautifully to do this. I added some chipboard hearts and the transparency from Sugar Rush and grounded the picture with the thin scallop from the same collection. For the title, I used a combination of pink Thickers and grey letters which I cut from my Cricut four times and stacked to give them the same height as the Thickers.
I felt that the title said it all so my journaling is simply the yellow punched tab that ran through the computer to add the date.

Now, since this is the first time I have participated in a blog hop, I thought I would give you the opportunity to win some blog candy right here. If you would like the chance to win a set of the Sugar Rush chip stickers that I used on my layout, please leave a comment here telling me about one of your favorite Valentine's memories. If you become a follower or subscriber, leave me a second comment telling me you did and your name will be entered twice. Once your've done that, hop on over to Becky's Blog for some more inspiration!

Supplies:
Cardstock: American Crafts
Patterned Paper: American Crafts (Dear Lizzy); Basic Grey (Sugar Rush)
Embelishments: Basic Grey Sugar Rush (Take Note and Chip Stickers); American Crafts Thickers;
Tools: Fiskars Border Punch (Scallop Sentiment); Marvy Uchida Punch; Cricut Cartridge (A Child's Year);